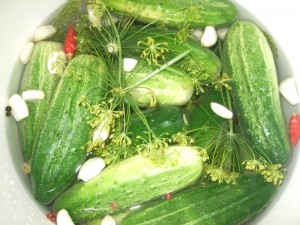
The cucumbers in our garden are doing alright, but they are not quite as productive as I’d hoped this year. And, they’re oddly-shaped–some are quite round and squat. They’re still delicious for fresh eating of course, but they’re not exactly ideal for making pickles. So, yesterday morning I headed to the farmers market for a bunch of pickling cukes and fresh dill heads so that I could get a batch of dill pickles going. I always choose 3 to 4 inch cukes that are quite slender, and very fresh, as I’ve found this to really make a difference in the success of my pickles. Rather than using vinegar to make these pickles, I’m fermenting them–a traditional method that has long been used for making many different types of pickled products. Essentially, the cucumbers sit in a salt brine solution for a few weeks, and during this fermentation process lactic acid is created, which pickles the food and helps to preserve it. Making pickles this way is easy to do, and the equipment is minimal. Though, success with this method does require that you are attentive to the pickles, checking on them daily or at least frequently, and that you’re patient, as it takes a few weeks for the pickles to ferment fully and be done.
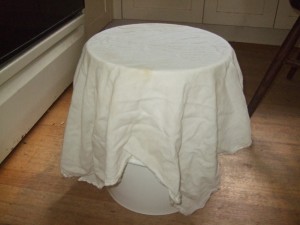
For equipment, you’ll need a container for fermenting, a plate (or something similar) to cover the cucumbers, something to add weight to the plate to keep the cucumbers fully-submerged in the brine, and a cloth to cover the fermenting container. For your fermenting container, in terms of capacity, you’ll need one gallon for every five pounds of cucumbers you wish to ferment. Ceramic crocks are great and are traditional for fermenting, but they can be expensive. Glass can also work, but I’ve found it difficult to locate glass containers that are both large enough and the right shape. For the best results, your container needs to have straight sides, allowing you to place a plate inside the container that will reach all the way (or almost all the way) to the edges of the container so that you can fully cover the cucumbers. For example, with Mason-style jars, which are generally tapered at the top, it’s difficult to fit a wide enough plate inside the jar to fully cover the cukes. Food grade plastic buckets are a good option. While I’m not crazy about using plastic, they work well, they’re inexpensive, and are easy to find (try your local delicatessen for their empties). These five-gallon buckets are what I’ve been for using for fermenting, and I’ll continue to use them until I can get my hands on some reasonably-priced crocks. For the weight that you’ll use to hold the plate down, most anything that is clean and non-reactive could work. Some people use plastic milk jugs filled with water, or cleaned, sanitized rocks. My preference is to use a half-gallon mason jar filled with water.
Fermented Dill Pickles
Ingredients:
4 pounds 3 or 4-inch pickling cucumbers
4 heads of fresh dill
1 1/2 heads of garlic
2 small dried red hot chile peppers
1 teaspoon black peppercorns
1/2 cup plus 2 Tablespoons salt (use only sea salt or pickling salt)
10 cups water
Directions:
1.)Place water and salt in a large bowl. Allow salt to dissolve, stirring occasionally, to create brine.
2.) Thoroughly rinse the cucumbers, and slice a tiny bit off of the bottom end of the cucumber. You don’t need to remove more than about 1/16th of an inch or so–the idea is just to completely remove the blossom from the end of the cuke. The stem end can remain as-is.
3.) Peel garlic and rinse dill heads.
4.) Place dill heads, garlic, peppercorns, and hot peppers on the bottom of your (clean!) fermenting container.
5.) Place the cucumbers in the fermenting container as well, on top of the spices, and pour in the brine.
6.) Place the plate into the container. Press it down gently so that it completely covers the cucumbers and holds them down. The brine should rise above the level of the plate. Place your (clean!) weight onto the plate to hold it down and in place. Make sure that your pickles are fully submerged under the brine (and make sure they remain that way throughout the fermentation process, except when your checking on them briefly).
7.) Cover fermenting container with a large, clean dish towel. Allow cucumbers to ferment at room temperature for a few weeks. Locating the container in your kitchen will work fine, though I prefer fermenting in my basement, which at a steady 70 degrees in the summer is cooler than my kitchen. At 70-75 degrees, your pickles should be fully fermented and done in 3 or 4 weeks. For best results, keep your fermenting temperatures 75 degrees or less. You can ferment at temperatures lower than 70 degrees, though the fermentation will take a bit longer.
8.) Check your pickles daily, or at least every other day. Carefully remove the cloth so as not to get any dirt or dust into the pickles, and carefully remove the weight and the plate. After a few days or so, mold or scum will probably start to form on the surface of the brine. This is normal. As long as the pickles have been fully submerged under the brine, the mold will not affect the pickles. Simply remove the mold with a spoon or other non-reactive utensil and discard it. Rinse the plate and weight to remove any scum, and then place them again on top of the pickles. Cover again with the cloth, and allow the pickles to continue to ferment.
9.) As you’re nearing the end of the fermentation process, taste your pickles when you check on them. Fermentation usually proceeds as it should, but on rare occasions something may go wrong, and spoilage may occur. Be observant of your pickles. If they smell bad, or are mushy or slimy, spoilage may have occurred. If you suspect spoilage, do not taste them, and discard them immediately. When proper fermentation is complete, the pickles will be olive green in color, firm in texture, and and you’ll recognize their taste, texture, and appearance as being, well, like a pickle.
10.) When your pickles are done, remove them from the brine, and rinse them off. Strain the brine to remove any scum or sediment. A coffee filter or fine-mesh cheese cloth work well for this. If you want to store your pickles in the refrigerator, pour the filtered brine in a food grade container with a tight lid, and place the pickles back in the brine. You can store them in the refrigerator this way, fully submerged in brine and covered with a lid, for about four to six months. Occasionally, small amounts of new scum or sediment may develop. Just strain this off occasionally when you notice it. As an alternative to refrigerator storage, you can can your pickles, using a hot water bath. To do this, prepare your canning jars, lids and bands, then heat up the canner water and sterilize your jars in the canner. Bring the filtered brine to a boil in a sauce pan, and simmer for about 5 minutes. Pack your pickles into hot jars and pour the hot brine over the pickles, leaving 1/2 inch headspace. Then remove bubbles, wipe rims, put on lids and bands, and place jars into canner. Cover, bring to a rolling boil, and process 10 minutes for pints, or 15 minutes for quarts. Turn off heat, wait five minutes, then remove jars from canner. Allow to cool untouched for 12-24 hours. Confirm that all jars have sealed properly, then store. Enjoy your pickles!


clarence
July 31st, 2014 at 03:39